![[Kubernetes] Ingress Challenge](https://img1.daumcdn.net/thumb/R750x0/?scode=mtistory2&fname=https%3A%2F%2Fblog.kakaocdn.net%2Fdna%2FG31jb%2FbtrC1i4mLY7%2FAAAAAAAAAAAAAAAAAAAAAHZnu2V6geCzSxzDVxIhbsySodLXwAyfkJL50dv3fNnr%2Fimg.png%3Fcredential%3DyqXZFxpELC7KVnFOS48ylbz2pIh7yKj8%26expires%3D1764514799%26allow_ip%3D%26allow_referer%3D%26signature%3DA3hBIs7hE4RqHmcxICY24AYdZkM%253D)

✔️ Challenge
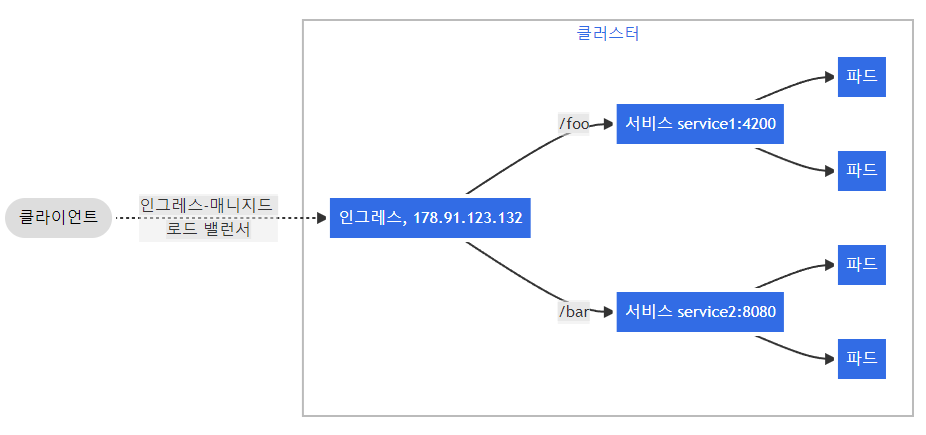
ㅇ다음과 같은 구조로 동작하도록 리소스를 생성해보자 !

Ingress Controller가 있고 SVC가 2개 있고 RS로 파드를 2개 생성한 구조이다.
똑같은 이름의 경로를 다르게 한다던지 host를 다르게 해주어 부하분산을 할 수 있다.
2개의 서비스를 만든다.
- 이미지 생성
- Apache Image 1
- Index.html (Hello One 출력)
- Apache Image 2
- Index.html (Hello Two 출력)
- Apache Image 1
- 각 이미지로 2개의 파드를 생성하는
ReplicaSet만들기 NodePort서비스 만들기- 서비스에
Ingress만들기 - 호스트는 동일 (
*.nip.io/one,*.nip.io/two)
→ 총 5개의 .yaml 파일이 생성되어야 한다.
✔️ Solution
Dockerfile
FROM httpd
COPY index.html /usr/local/apache2/htdocs/index.html
index.html
<h1> Hello One </h1>이미지를 생성하기 위한 Dockerfile을 만든다.
vagrant@docker ~ mkdir hello-one
vagrant@docker ~ mkdir hello-two
vagrant@docker ~ cd hello-one
vagrant@docker ~/hello-one vi Dockerfile
vagrant@docker ~/hello-one vi index.html
vagrant@docker ~/hello-one docker build -t ttoii/hello:one .
Sending build context to Docker daemon 3.072kB
Step 1/2 : FROM httpd
---> c30a46771695
Step 2/2 : COPY index.html /usr/local/apache2/htdocs/index.html
---> 4c9d9c49c3e0
Successfully built 4c9d9c49c3e0
Successfully tagged ttoii/hello:one적당한 디렉토리를 만들고 hello:one이미지를 빌드한다.
vagrant@docker ~/hello-one cd ../hello-two/
vagrant@docker ~/hello-two vi Dockerfile
vagrant@docker ~/hello-two vi index.html
vagrant@docker ~/hello-two docker build -t ttoii/hello:two .
Sending build context to Docker daemon 3.072kB
Step 1/2 : FROM httpd
---> c30a46771695
Step 2/2 : COPY index.html /usr/local/apache2/htdocs/index.html
---> f65c5fb713fe
Successfully built f65c5fb713fe
Successfully tagged ttoii/hello:twohello:two이미지도 마찬가지로 빌드한다.
vagrant@docker ~/hello-two docker login
Login with your Docker ID to push and pull images from Docker Hub. If you don't have a Docker ID, head over to https://hub.docker.com to create one.
Username: ttoii
Password:
WARNING! Your password will be stored unencrypted in /home/vagrant/.docker/config.json.
Configure a credential helper to remove this warning. See
https://docs.docker.com/engine/reference/commandline/login/#credentials-store
Login SucceededDocker Hub에 로그인한다.
vagrant@docker ~/hello-two docker run -d -p 80:80 ttoii/hello:one
0e4d0dbe3f7e1638c8a1225c4f3394c84483b251166a7aaa01dfc927220f6313
vagrant@docker ~/hello-two curl localhost
<h1> Hello One </h1>빌드한 이미지가 정상적으로 작동하는지 테스트한다.
vagrant@docker ~/hello-two docker push ttoii/hello:one
The push refers to repository [docker.io/ttoii/hello]
41085c977746: Pushed
e83f42350a11: Pushed
67bb571b5bd2: Pushed
ec02eb7f3cf4: Pushed
1d1a2486e901: Pushed
9c1b6dd6c1e6: Pushed
one: digest: sha256:a0b6840986fd53187f11245185c779bce38425bb918be52db5ea69e650ce235f size: 1572
vagrant@docker ~ docker push ttoii/hello:two
The push refers to repository [docker.io/ttoii/hello]
c30217e1183f: Pushed
e83f42350a11: Layer already exists
67bb571b5bd2: Layer already exists
ec02eb7f3cf4: Layer already exists
1d1a2486e901: Layer already exists
9c1b6dd6c1e6: Pushed
two: digest: sha256:493a234d059faf10b2746d799ce50f88f364ce17ca25de5f82c8390bde79880a size: 1572이미지를 Docker Hub에 push한다.
one-rs.yaml
apiVersion: apps/v1
kind: ReplicaSet
metadata:
  name: one-rs
spec:
  replicas: 3
  selector:
    matchLabels:
      app: hello-one
  template:
    metadata:
      labels:
        app: hello-one
    spec:
      containers:
        - name: hello-one
          image: ttoii/hello:one
          ports:
            - containerPort: 80
              protocol: TCP
one-svc-np.yaml
apiVersion: v1
kind: Service
metadata:
  name: one-svc-np
spec:
  type: NodePort
  selector:
    app: hello-one
  ports:
    - port: 80
targetPort: 80two-svc-np.yaml, two-rs.yaml 파일도 one → two로 바꾸어 작성한다.
hello-ing.yaml
apiVersion: networking.k8s.io/v1
kind: Ingress
metadata:
  name: hello-ing
spec:
  rules:
    - host: '*.nip.io'
      http:
        paths:
          - path: /one
            pathType: Prefix
            backend:
              service:
                name: one-svc-np
                port:
                  number: 80

          - path: /two
            pathType: Prefix
            backend:
              service:
                name: two-svc-np
                port:
                  number: 80
다음과 같이 .yaml 파일을 작성한다.
hello-multihost.yaml
apiVersion: networking.k8s.io/v1
kind: Ingress
metadata:
  name: hello-mh-ing
spec:
  rules:
    - host: 'one.*.nip.io'
      http:
        paths:
          - path: /
            pathType: Prefix
            backend:
              service:
                name: one-svc-np
                port:
                  number: 80
    - host: 'two.*.nip.io'
      http:
        paths:
          - path: /
            pathType: Prefix
            backend:
              service:
                name: two-svc-np
                port:
                  number: 80
one.x.nip.io/ -> one-svc-np 에 연결되어 있는 파드 중에 하나로 연결시킨다.
ip가 10.233.10.10 이라고 하면 one.x.nip.io/ 해당 요청을 10.233.10.10으로 다시 요청한다.
(참고로 해당 파일은 리소스 생성에 사용하지 않는다. 아래 hello-multipath.yaml 파일과의 비교를 위해 작성했다.)
hello-multipath.yaml
apiVersion: networking.k8s.io/v1
kind: Ingress
metadata:
  name: hello-mp-ing
  annotations:
    nginx.ingress.kubernetes.io/rewrite-target: / # URL 재작성
spec:
  rules:
    - host: '*.nip.io'
      http:
        paths:
          - path: /one
            pathType: Prefix
            backend:
              service:
                name: one-svc-np
                port:
                  number: 80
          - path: /two
            pathType: Prefix
            backend:
              service:
                name: two-svc-np
                port:
                  number: 80
x.nip.io/one 로 요청한다.one-svc-np 에 연결되어 있는 파드 중 하나가 10.233.10.10 라고 하자
x.nip.io/one 요청은 10.233.10.10/one으로 요청한다. 경로가 그대로 붙는다.
여기서 문제는 404 Not Found 응답이다.
/one 이라는 경로에 아무런 컨텐츠가 없다.
httpd 이미지 밑에 /index.html 은 있으나 /one 이라는 경로 자체가 존재하지 않는다.
그래서 404 Not Found 응답이 뜨는 것이다.
annotations은 식별 데이터가 아니며 단순히 정보를 저장하는 비식별 데이터이다.
어플리케이션이 해당 메타데이터를 참조할 수 있으며 어플리케이션의 작동을 변경할 수 있다.
rewrite-target - 타겟의 경로를 재작성한다.rewrite-target이 없다면 x.nip.io/one 요청을 10.233.10.10/one으로 요청한다.rewrite-target가 있다면 /one 경로를 root로 변경한다.
타겟의 App에 /one 이라는 경로가 있다면 그 경로대로 가면된다.
하지만 /one이라는 경로가 없으므로 /one을 root로 변경해야 한다.
경로를 통해서 부하분산 할 수 있기 때문에 모든 L7 LoadBalancer는 rewrite라는 개념이 존재한다.
vagrant@node1 ~/svc/ing/multipath kubectl create -f .
ingress.networking.k8s.io/hello-mp-ing created
replicaset.apps/one-rs created
service/one-svc-np created
replicaset.apps/two-rs created
service/two-svc-np created
vagrant@node1 ~/svc/ing/multipath kubectl describe ing hello-mp-ing
Name: hello-mp-ing
Namespace: default
Address:
Default backend: default-http-backend:80 (<error: endpoints "default-http-backend" not found>)
Rules:
Host Path Backends
---- ---- --------
*.nip.io
/one one-svc-np:80 (10.233.90.61:80,10.233.92.101:80,10.233.96.71:80)
/two two-svc-np:80 (10.233.90.60:80,10.233.92.100:80,10.233.96.72:80)
Annotations: nginx.ingress.kubernetes.io/rewrite-target: /
Events:
Type Reason Age From Message
---- ------ ---- ---- -------
Normal Sync 7s nginx-ingress-controller Scheduled for sync
Normal Sync 7s nginx-ingress-controller Scheduled for sync
Normal Sync 7s nginx-ingress-controller Scheduled for sync vagrant@node1 ~/svc/ing/multipath curl 192-168-100-100.nip.io/one
<h1> Hello One </h1>
vagrant@node1 ~/svc/ing/multipath curl 192-168-100-100.nip.io/two
<h1> Hello Two </h1>작성한 경로대로 트래픽이 전달되며 기대했던 결과를 응답하는 것을 확인할 수 있다.
'DevOps > Kubernetes' 카테고리의 다른 글
| [Kubernetes] Volume (emptyDir, gitRepo, initContainer, hostPath) (0) | 2022.05.29 |
|---|---|
| [Kubernetes] Readiness Probe (준비성 프로브) (0) | 2022.05.29 |
| [Kubernetes] Ingress (인그레스) (0) | 2022.05.29 |
| [Kubernetes] Service - ExternalName (0) | 2022.05.23 |
| [Kubernetes] Service - LoadBalancer ( + METALLB : on-prem 환경의 LB) (0) | 2022.05.23 |

영차영차 성장 블로그
포스팅이 좋았다면 "좋아요❤️" 또는 "구독👍🏻" 해주세요!
![[Kubernetes] Volume (emptyDir, gitRepo, initContainer, hostPath)](https://img1.daumcdn.net/thumb/R750x0/?scode=mtistory2&fname=https%3A%2F%2Fblog.kakaocdn.net%2Fdna%2FcI38gA%2FbtrC7MD32d0%2FAAAAAAAAAAAAAAAAAAAAAD8YPMziT8fAVV34_vyHdldLXfaQrYYK9PhLLpPwp8au%2Ftfile.svg%3Fcredential%3DyqXZFxpELC7KVnFOS48ylbz2pIh7yKj8%26expires%3D1764514799%26allow_ip%3D%26allow_referer%3D%26signature%3DiFP2jYxvclI68Xi3Cs1JEqz4h3w%253D)
![[Kubernetes] Readiness Probe (준비성 프로브)](https://img1.daumcdn.net/thumb/R750x0/?scode=mtistory2&fname=https%3A%2F%2Fblog.kakaocdn.net%2Fdna%2FdfgV6t%2FbtrC74ykhUm%2FAAAAAAAAAAAAAAAAAAAAAMg2ljkXTMQu1139TGcpuQrk_PlSFoH0SKnv2djN6zmh%2Fimg.png%3Fcredential%3DyqXZFxpELC7KVnFOS48ylbz2pIh7yKj8%26expires%3D1764514799%26allow_ip%3D%26allow_referer%3D%26signature%3DUmn%252FgBYRMpTAxBBbO4v5IIvstN4%253D)
![[Kubernetes] Ingress (인그레스)](https://img1.daumcdn.net/thumb/R750x0/?scode=mtistory2&fname=https%3A%2F%2Fblog.kakaocdn.net%2Fdna%2FYtKIl%2FbtrC2vuWeMi%2FAAAAAAAAAAAAAAAAAAAAABO_6gZ-ep4uZYFHpvsH-8uW9LwZEDGwTWH4qJBqDpIA%2Fimg.png%3Fcredential%3DyqXZFxpELC7KVnFOS48ylbz2pIh7yKj8%26expires%3D1764514799%26allow_ip%3D%26allow_referer%3D%26signature%3DK9eZUWRu6hx9lkBGSaiZCPohBjY%253D)
![[Kubernetes] Service - ExternalName](https://img1.daumcdn.net/thumb/R750x0/?scode=mtistory2&fname=https%3A%2F%2Fblog.kakaocdn.net%2Fdna%2FbxD2GM%2FbtrCOqgelcG%2FAAAAAAAAAAAAAAAAAAAAAB7cPnnzIgVqC33cwb-JHcvo1x14w4ULpws9zyl0GlH4%2Fimg.png%3Fcredential%3DyqXZFxpELC7KVnFOS48ylbz2pIh7yKj8%26expires%3D1764514799%26allow_ip%3D%26allow_referer%3D%26signature%3DUPbCrlinNuyPfhessJazWqY5o0s%253D)